Your Cart
Loading

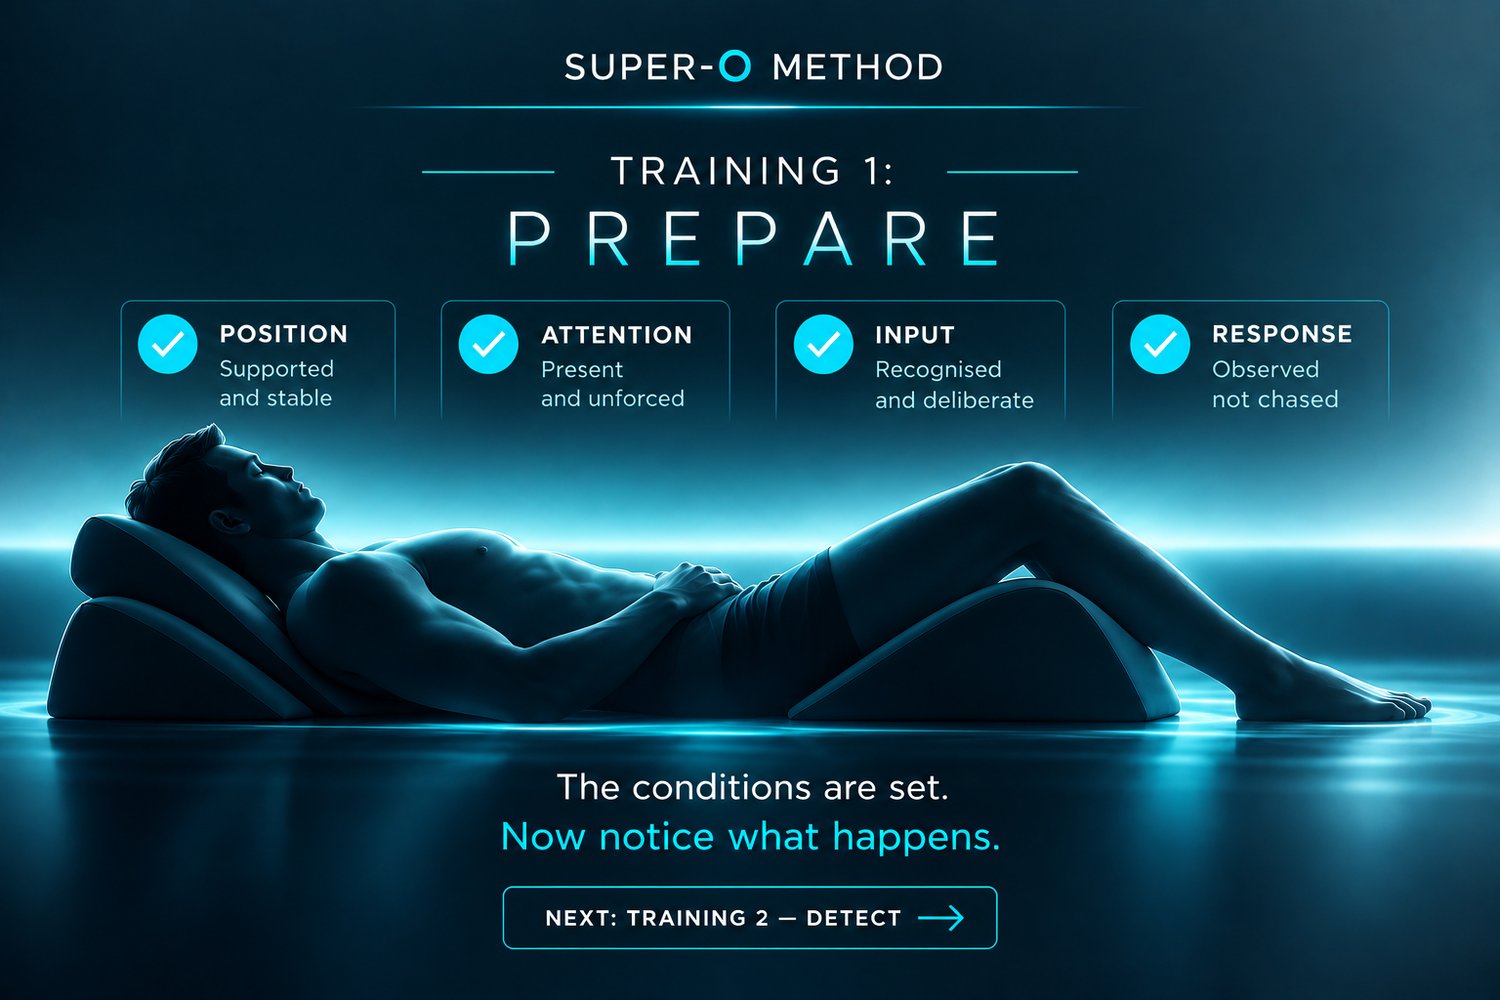
TRAINING 1

PREPARE

Create the conditions before you ask the body to respond.

The first stage of the Super-O Method is about establishing a clean starting point — before trying to detect or develop a response.

Prepare the conditions.

Don’t chase the response.

WHAT YOU ARE TRAINING

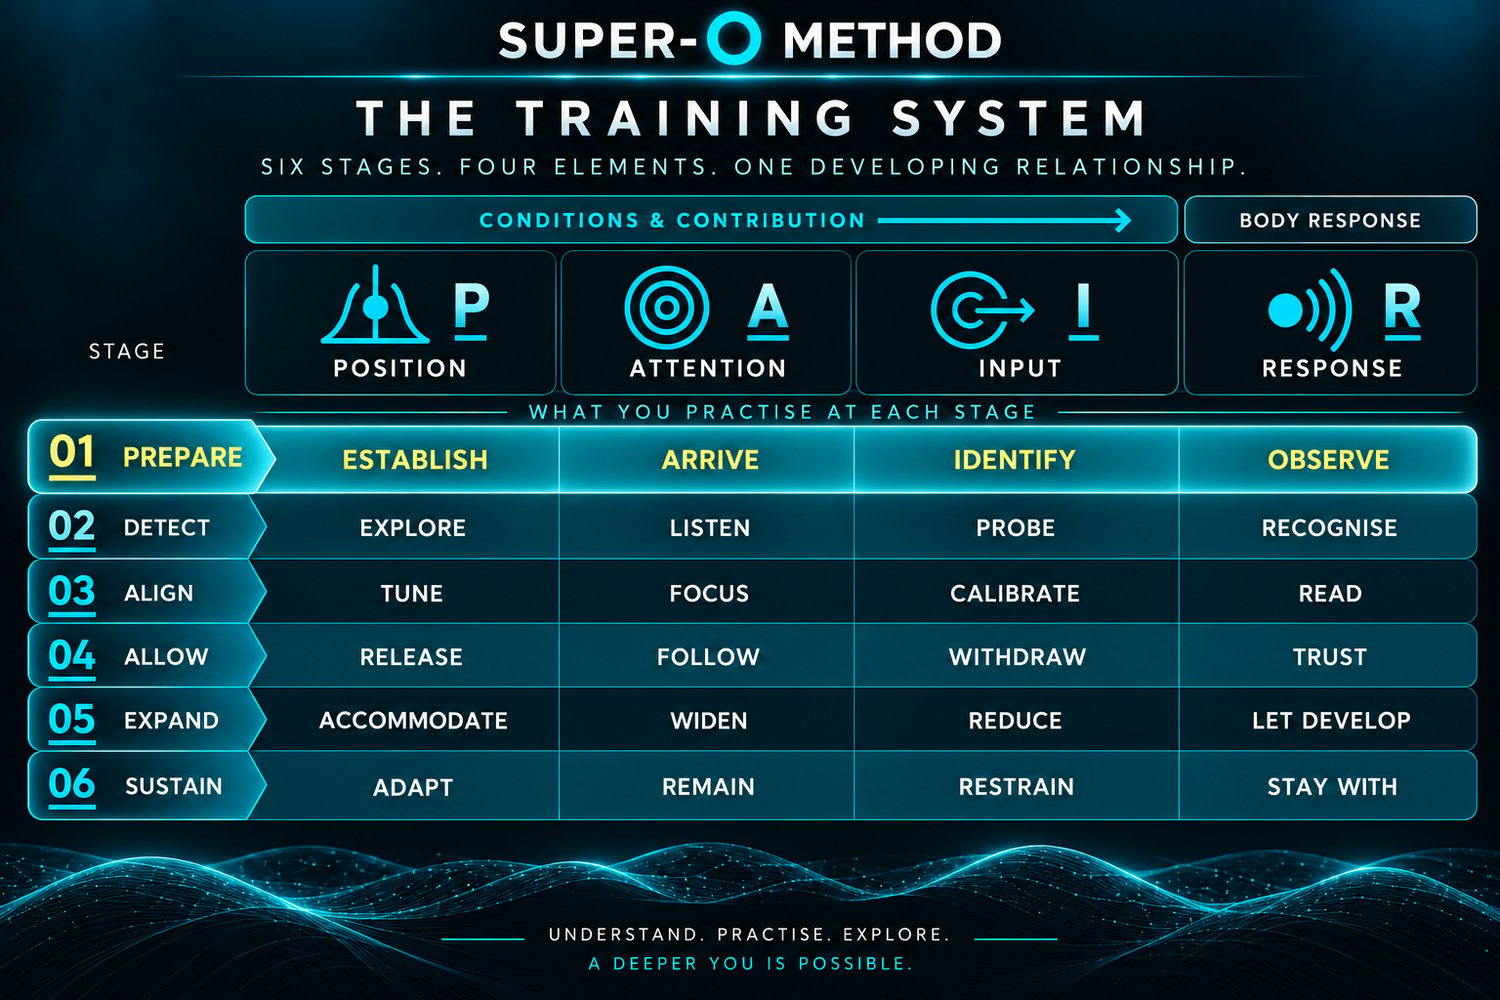
Training 1 establishes your starting conditions across PAIR.

POSITION — ESTABLISH

ATTENTION — ARRIVE

INPUT — DISTINGUISH

RESPONSE — BASELINE


P · POSITION

ESTABLISH

For early training, begin with one of two positions:

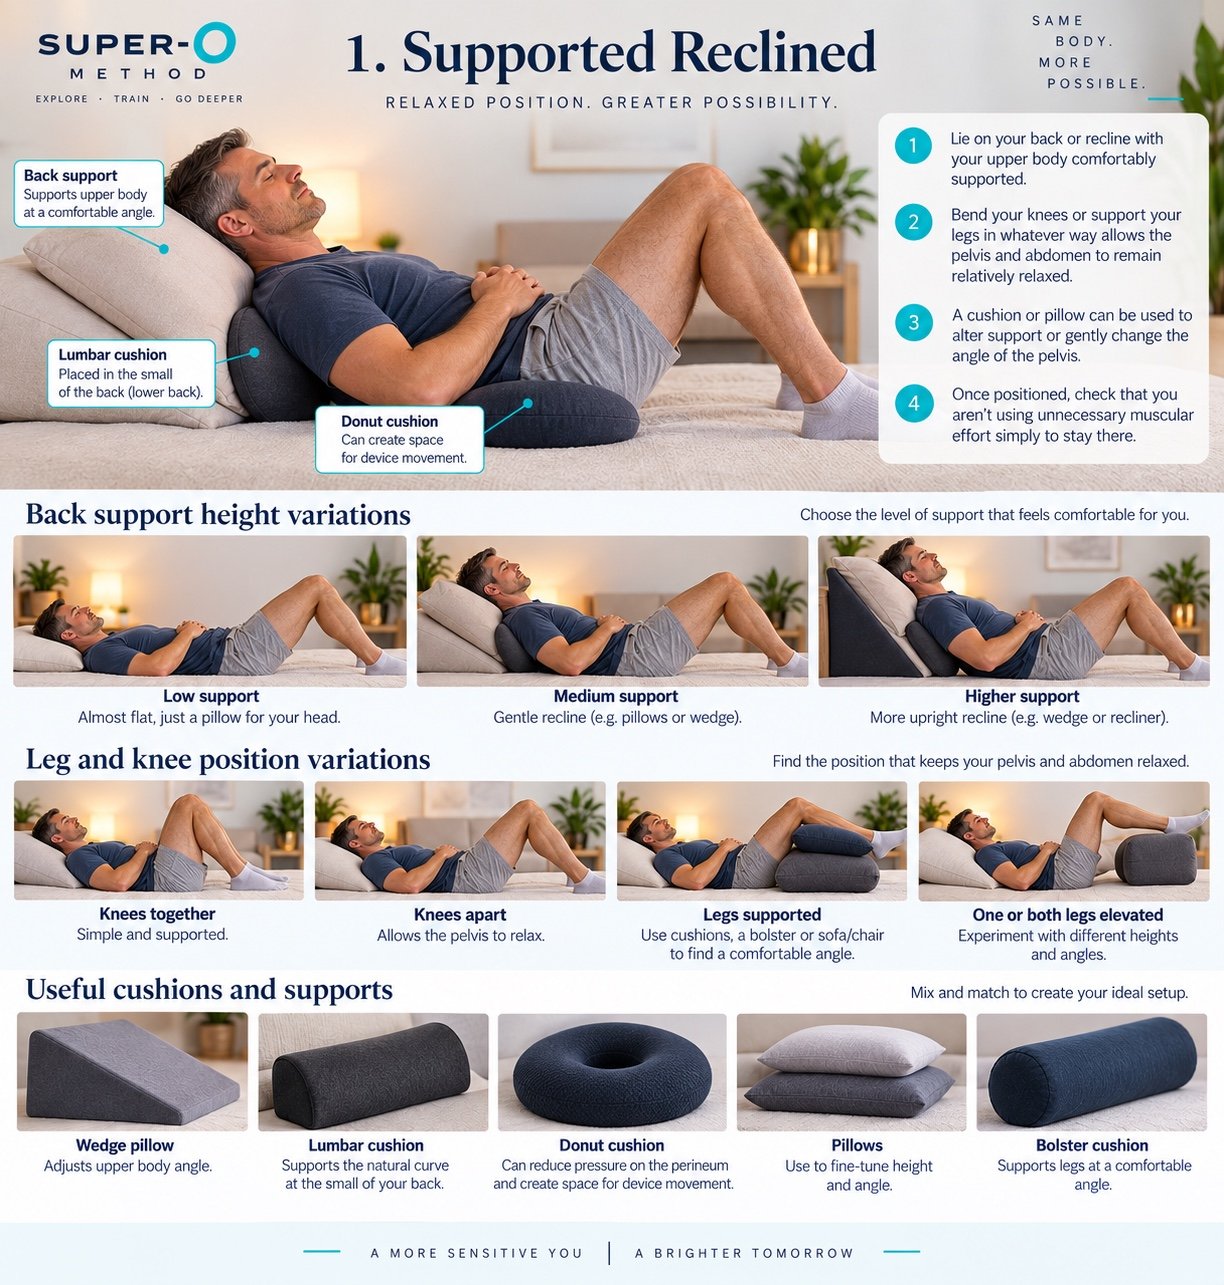
Supported Reclined

or

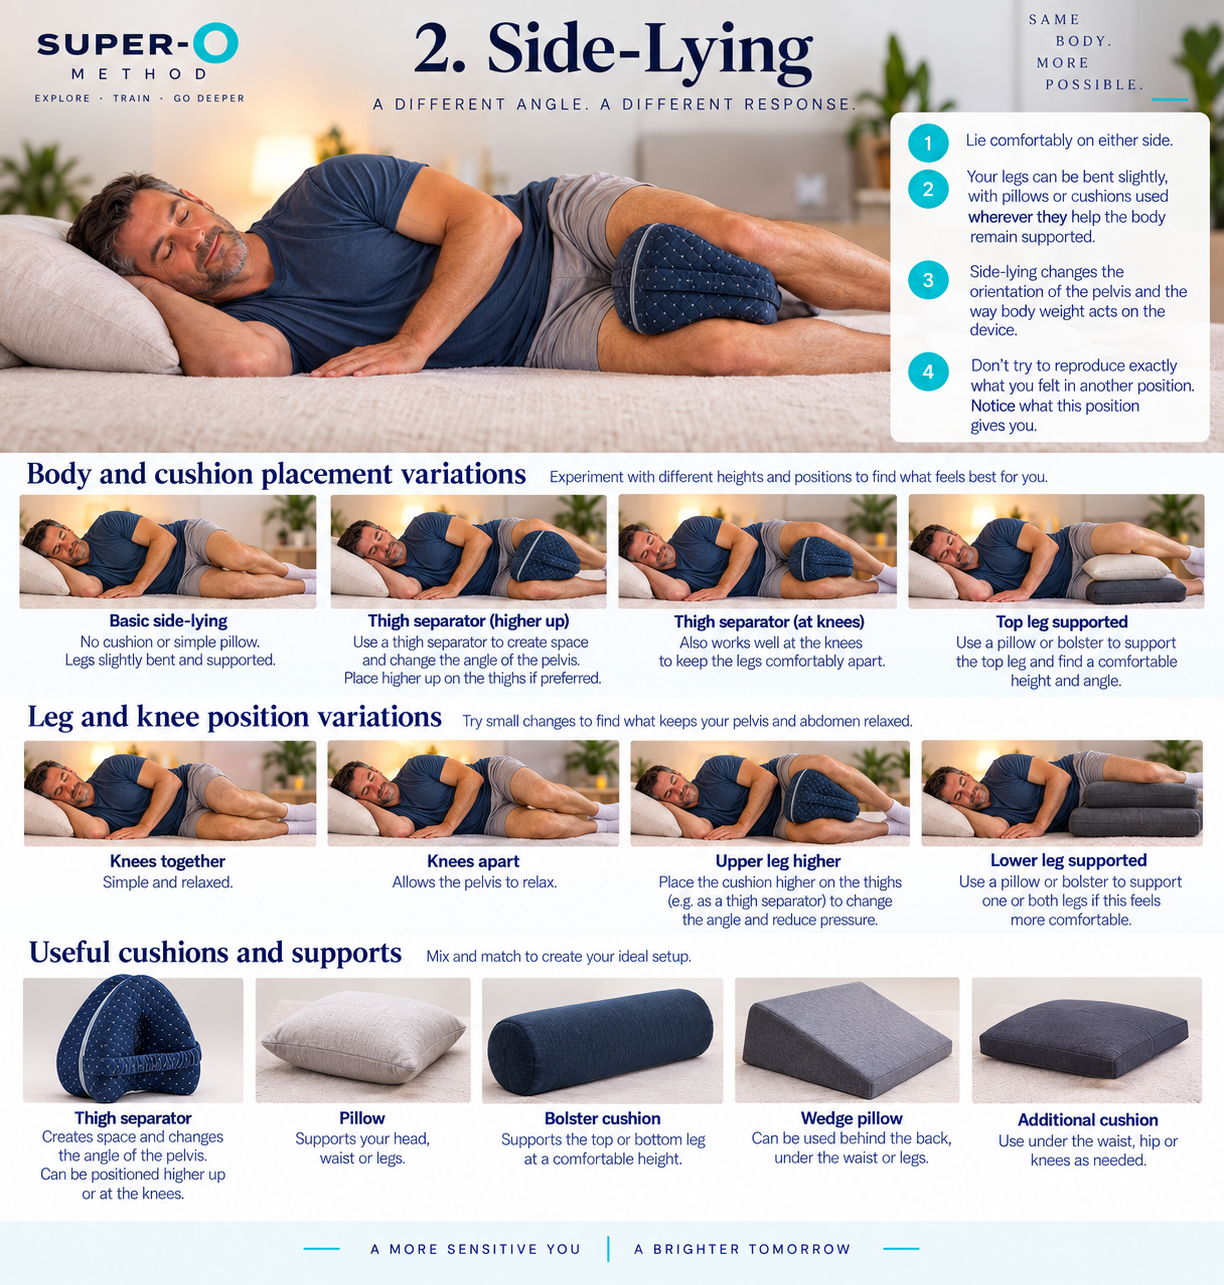
Side-Lying

Both make it relatively easy to support the body, reduce unnecessary muscular effort and remain still long enough to notice what happens.

There is no universally correct Super-O position.

You are looking for a comfortable, sustainable starting geometry.

You don't need specialist equipment. Ordinary pillows and cushions may provide all the support you need.

1. SUPPORTED RECLINED

Take a good look at the illustration before you begin.

Notice the relationship between the upper body, pelvis, knees and the different support options shown.

Recline with your upper body comfortably supported and your knees bent. Use cushions or pillows where needed to support your body or create a small amount of pelvic elevation.

You don't need to reproduce the illustration exactly.

Use it to understand the basic geometry, then adapt it to your own body.

Comfort first. Precision later.


2. SIDE-LYING

Take a good look at the illustration before you begin.

Notice the relationship between the torso, pelvis and legs, and where additional support can be introduced.

Lie comfortably on either side with your head properly supported. Position your legs naturally and, if helpful, place a pillow between your knees.

Allow the bed to carry your weight rather than holding yourself rigidly in position.

You don't need to reproduce the illustration exactly.

Use it to understand the basic geometry, then adapt it to your own body.

Let the position support you.


WHICH SHOULD YOU CHOOSE?

Try both positions over your first few sessions.

If one immediately feels easier to settle into, begin there.

You don't need to decide which is your “best” position. Bodies differ, devices differ, and even your own preferred setup may vary between sessions.

Choose somewhere comfortable enough to stop thinking about Position.


POSITION DOESN'T NEED TO BE PERFECT

You are looking for a position that is comfortable, sustainable and allows your body to settle.

You don't need specialist equipment. Ordinary pillows and cushions may provide all the support you need.

And you don't need to optimise every detail before you begin training.

Find somewhere that works. Then give your body time to be there.

DRILL 01

THE SUPPORT TEST

Settle into your chosen position.

Then ask:

If I stopped helping, would my body remain comfortably here?

Notice whether you’re using muscular effort simply to maintain the setup.

Check:

Jaw. Shoulders. Abdomen. Buttocks. Thighs. Pelvic floor.

You don’t need to force these areas to relax. Just notice unnecessary holding.

Change your support if necessary.

Then remain still for 60–90 seconds.


WHAT ARE YOU LOOKING FOR?

A position you can maintain without continually correcting yourself.

If your body can settle and the position can largely look after itself, the setup is doing its job.

Let the support do the work.


DRILL 02

MAP THE POSITION

Consider the broad geometry of your position.

Make one noticeable adjustment.

For example:

Change the pelvic angle slightly.

Move the knees closer together or further apart.

Alter the amount of elevation or support.

Change how your weight is being carried.

Then:

CHANGE → STOP → WAIT → COMPARE


Give the new position 30–60 seconds.

Ask:

More comfortable? Less comfortable? Simply different?

Has the internal contact changed?

If useful, return to the previous position and compare.

Changing one thing at a time isn’t a rule. It simply makes differences easier to recognise.

You are not looking for the position that creates a Super-O.

You are learning that Position changes the conditions.


DRILL 03

GO SMALL

Once the broad setup feels workable, make the experiment smaller.

First find the neighbourhood.

Then explore the street.

Try:

A slight pelvic adjustment.

A little more or less elevation.

A small change in leg position.

A subtle shift of body weight.

A tiny change in your relationship with a device.

Then:

ADJUST → STOP → WAIT


The last part matters.

If you continually adjust, you continually supply Input.

You need periods in which nothing changes deliberately. That gives your body time to show you what follows.

Make the adjustment. Then leave it alone long enough to learn from it.

CONTACT IS NOT PRESSURE

More pressure is not automatically better contact.

Stronger sensation does not automatically mean better Position. In fact, learning to notice subtle differences can be more useful than pursuing intensity.

You are looking for a setup you can sustain without forcing the body.

Pain, burning, numbness or persistent discomfort means change the setup or stop.

If pressure, contact or comfort is becoming a problem:

→ TROUBLESHOOTING


WHEN IS POSITION GOOD ENOUGH?

Stop adjusting when:

You’re comfortable.

Your body is properly supported.

You can remain still without unnecessary effort.

The device feels comfortably positioned.

There is no distracting pressure or discomfort.

Further adjustments aren’t producing an obviously useful improvement.

That’s enough.

You do not need to optimise every millimetre before continuing. Endless optimisation can become its own form of interference.

Position gets you there.

Stillness lets you discover what happens there.


GO DEEPER

POSITION OPTIMISATION

Want to explore Position further?

Discover Supported Seated and Front-Lying, additional variations, cushions and supports, pelvic geometry, device relationship and more detailed positional optimisation.

→ EXPLORE POSITION OPTIMISATION

THE BODY

Explore how the pelvic region, nervous system and wider body work together to shape sensation and Response.

→ THE BODY

A · ATTENTION

ARRIVE

Once Position is settled, don’t immediately hunt for prostate sensation.

Start wider.

Notice where your body meets the surface beneath you. Notice your legs, abdomen, breathing and pelvis.

Then allow awareness to include whatever internal sensation is already there.

You don’t need to concentrate intensely on the prostate. You don’t even need to be certain what you’re feeling.

Attention is for noticing, not searching.


DRILL 04

WIDE → MEDIUM → WIDE

Begin with attention spread across your whole body.

Notice your weight, breathing and the surface supporting you.

Then gently narrow your attention towards the pelvis.

Stay there for a short while without trying to make anything happen.

Then widen your attention again.

WIDE → MEDIUM → WIDE


Repeat this a few times.

Notice how sensation can become more or less prominent simply because of where attention is placed.

You are not trying to intensify sensation.

You are learning to move attention without turning it into effort.

Notice more. Chase less.

ATTENTION WITHOUT EFFORT

Attention can easily become another form of Input.

If you stare internally, strain to feel something, or repeatedly ask whether anything is happening, you are no longer simply noticing.

Try to let awareness rest rather than grip.

You can notice the pelvis without excluding the rest of the body. You can notice sensation without needing to interpret it.

And if there is very little to notice, that is fine.

Quiet is still information.

The aim in Prepare is simply to become present enough to notice what is already there.

Be interested, not demanding.


GO DEEPER

Learn how to recognise subtle changes in sensation without monitoring everything you feel.

Discover how a lighter, more receptive Attention can help you notice your body's natural Response.

→ EXPLORE ATTENTION WITHOUT INTERFERENCE

I · INPUT

DISTINGUISH

Input is anything you deliberately contribute.

A contraction. A squeeze. A change in breathing. A pelvic movement. An adjustment of the device. Even deliberately trying to relax can become Input.

None of these things are necessarily wrong.

At this stage, the important thing is simply to know what you are doing deliberately.

If you can distinguish your own contribution, it becomes much easier later to recognise what the body is doing in return.

Know what you add before you interpret what follows.

DRILL 05

THE INPUT AUDIT

Settle into your position and remain still for a moment.

Now notice what you are deliberately doing.

Check for:

Pelvic contractions.

Holding or controlling the breath.

Tensing the abdomen, buttocks or thighs.

Moving or adjusting the pelvis.

Trying to increase contact with a device.

Deliberately trying to relax.

You don’t need to stop any of it yet.

Simply identify:

DELIBERATE INPUT


Spend 60–90 seconds noticing your own contribution.

The purpose is not to become completely passive. It is to make deliberate action easier to recognise.

If you know what you are adding, you can better distinguish what happens next.


DRILL 06

INPUT TOGGLE

Choose one small, deliberate Input.

For example, a gentle pelvic contraction.

Apply it briefly.

Then stop.

Wait.

Repeat several times.

INPUT ON → INPUT OFF → WAIT


Pay attention to the difference between the moment you are deliberately doing something and the period after you stop.

Don’t use the waiting period to investigate what the body does in response. That comes later.

For now, you are simply making the boundary around deliberate Input clearer.

Do something. Stop doing it. Learn the difference.

R · RESPONSE

BASELINE

Response is what the body does within the conditions you have created.

In Prepare, you are not trying to identify a particular response or decide whether something is significant.

You are establishing a baseline.

What is present when you are comfortable, attentive and no longer deliberately changing anything?

There may be warmth, pressure, movement, tension, pulsing, pleasure — or very little at all.

You do not need to explain it.

First learn what “here, now” feels like.

DRILL 07

BASELINE

Settle into your position.

Let your attention arrive.

Notice any deliberate Input, then allow things to become quiet.

Wait for 60–90 seconds without trying to create a particular sensation.

Then simply notice what is present.

It might be:

Pressure.

Warmth.

Tension.

Movement.

Pulsing.

Pleasure.

Nothing obvious.

Don’t decide whether it is good, bad, important or meaningful.

SETTLE → WAIT → NOTICE


This is your baseline for this moment — not a target you need to reproduce.

Notice what is there before asking what it means.


DRILL 08

CHANGE AND RETURN

Begin from your baseline.

Now change one thing.

It might be:

A small change in Position.

A shift in Attention.

A brief deliberate Input.

Wait long enough to notice whether the experience feels different.

Then return to your original setup.

BASELINE → CHANGE → WAIT → RETURN


Keep the comparison simple.

Different? Similar? Nothing obvious?

You are not trying to explain why the change mattered or interpret the body’s Response in detail. That comes later.

For now, you are learning that changing the conditions can change the experience.

Change one thing. Notice. Return.

DESCRIBE BEFORE YOU EXPLAIN

During Prepare, keep your observations simple.

Instead of:

“That must have been the prostate responding.”

Try:

“There was a brief pulse.”

Instead of:

“I’m getting closer.”

Try:

“The sensation became warmer and more noticeable.”

Instead of:

“Nothing happened.”

Try:

“Nothing obvious changed.”

Description keeps you close to what you actually experienced.

Interpretation comes later.

Notice first. Explain later.


WANT MORE PRACTICE?

The eight drills on this page are enough to complete Prepare.

If you want to spend longer establishing your starting conditions, there are eight additional exercises covering Position, Attention and Input in more depth.

→ EXPLORE PREPARE — FURTHER DRILLS


READY TO MOVE ON?

You don’t need to master Prepare.

If you can settle into a workable position, recognise your own deliberate Input and spend some time simply noticing what is present, you have enough to continue.

NEXT: → TRAINING 2: DETECT