TRAINING 3
ALIGN
Learn what helps your body respond — and what gets in its way.
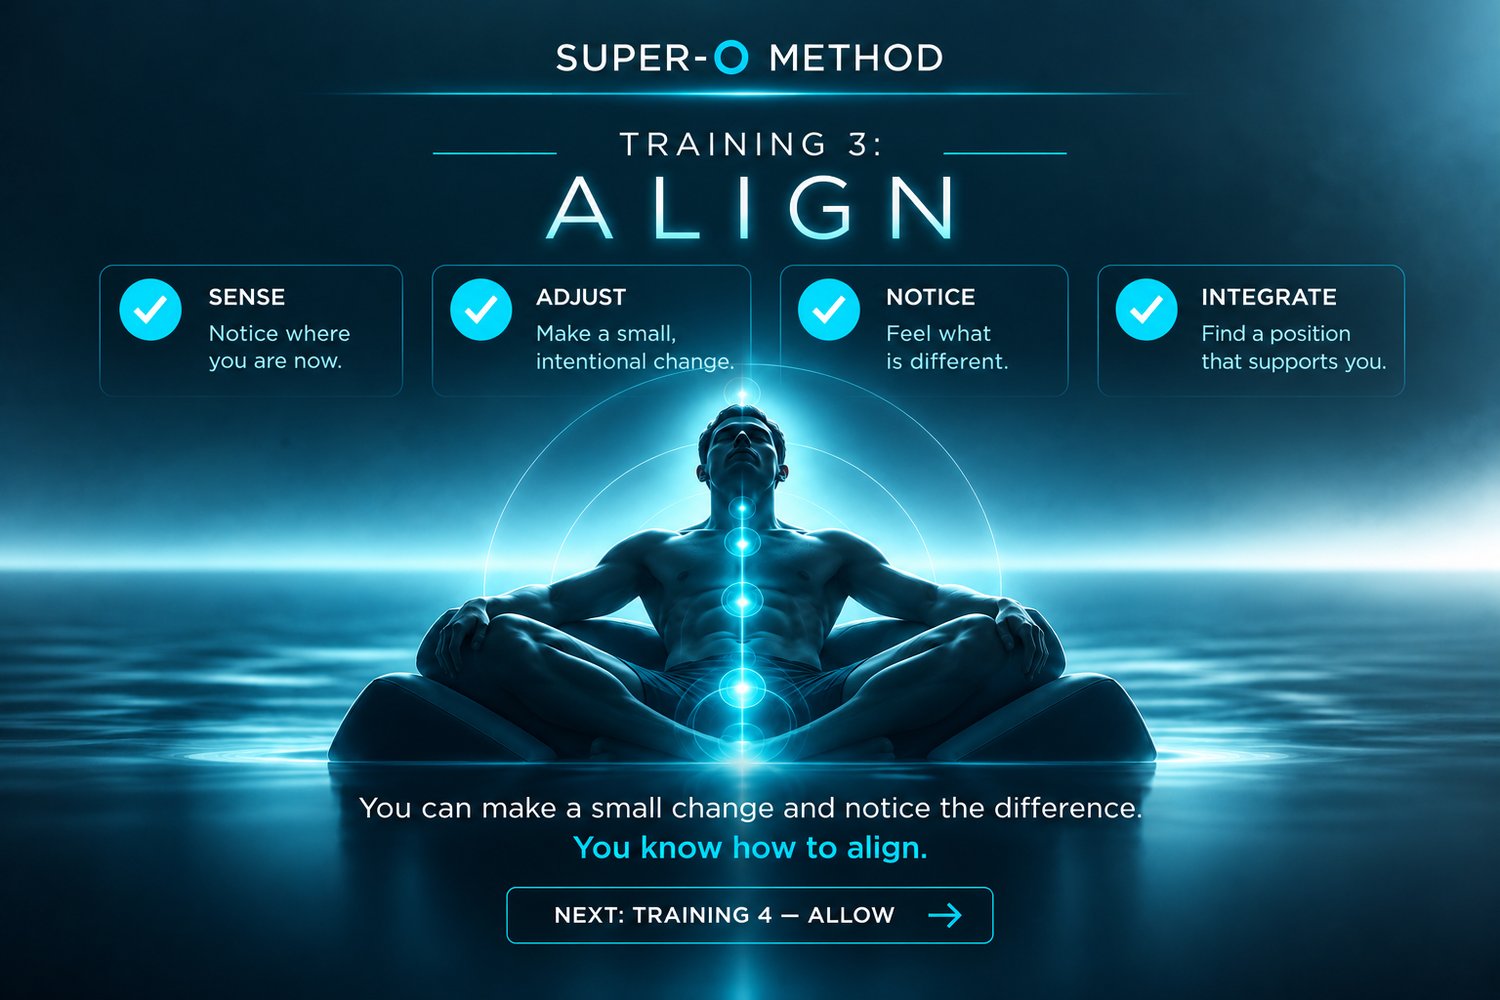
Make small changes. Notice what happens next. Alignment is about learning which conditions support Response — and when the best adjustment is no adjustment at all.

Learn what helps your body respond — and what gets in its way.
Make small changes. Notice what happens next. Alignment is about learning which conditions support Response — and when the best adjustment is no adjustment at all.
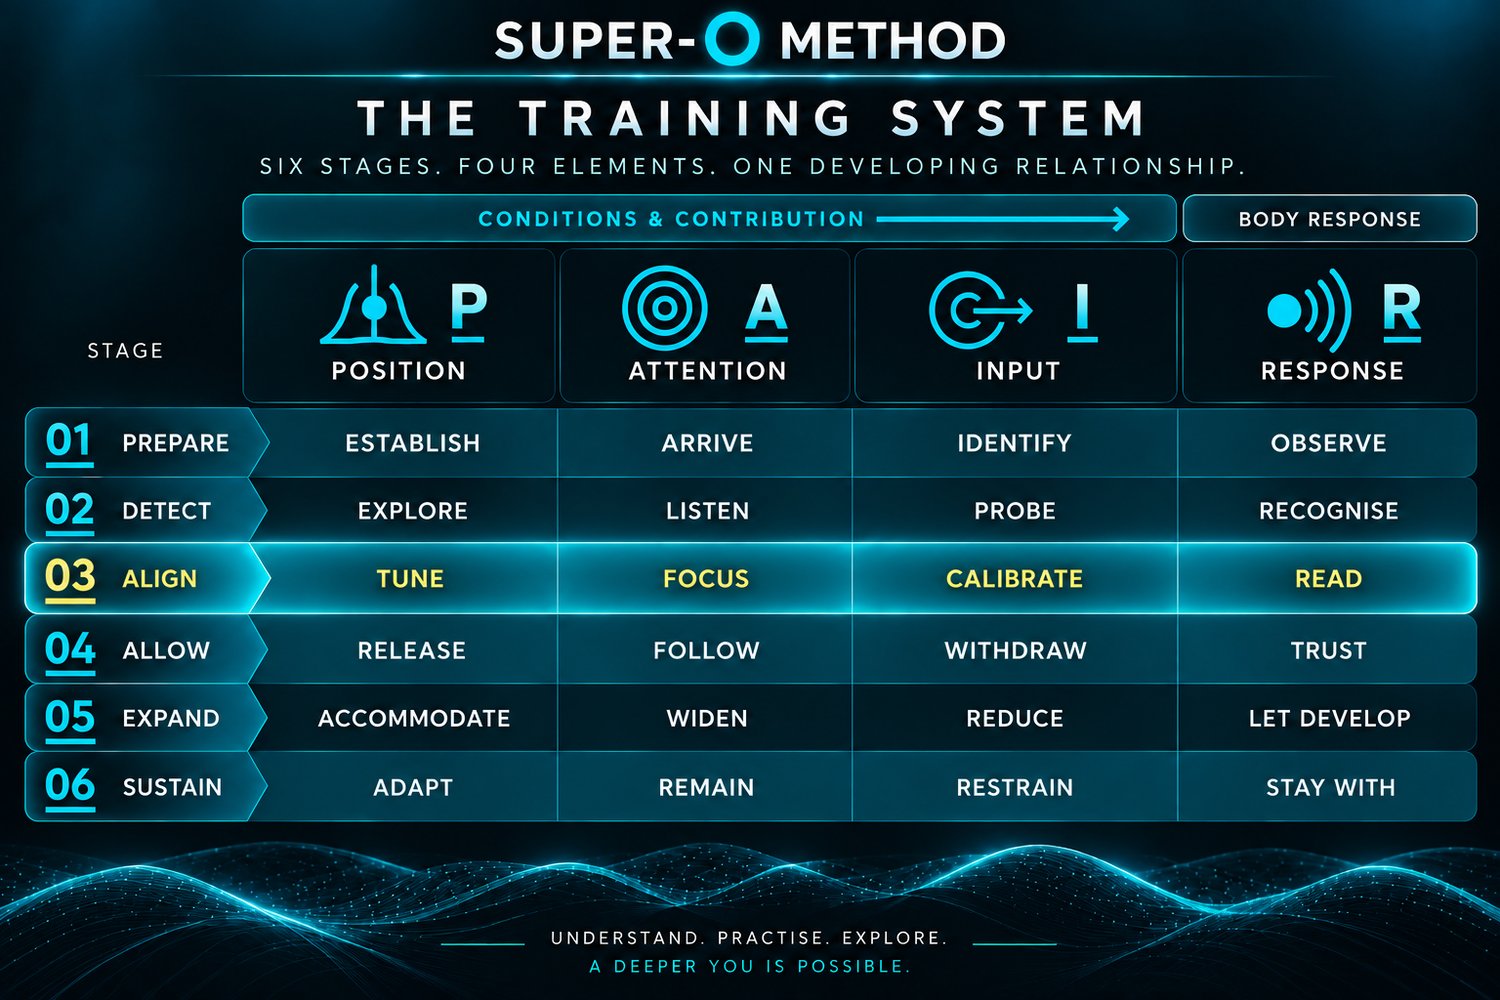
Training 3 teaches you to adjust PAIR by reading what happens next.
Tune the conditions for Response
By now, you should have at least one comfortable practice position from Prepare.
In Align, you begin tuning that position.
Small changes in pelvic angle, hip position, leg position, support or contact can noticeably change the Response. The aim is not to keep moving until something happens, but to make one small adjustment and notice what changes.
If Response becomes clearer, stop adjusting and give it time.
If it weakens, return towards the previous position.
If nothing changes, resist the temptation to keep searching. Sometimes very little Response is available, and more adjustment will not create it.
The sweet spot is not necessarily one precise physical spot that you have to find.
It is better understood as a recognisable feeling that develops when the conditions align.
It may reveal itself with your body in slightly different positions, and the sensation itself may feel slightly different from one session to another.
Look for responsiveness: small Inputs producing clearer sensations, a feeling becoming easier to recognise, or Response beginning to continue with less deliberate effort.
Don’t hunt for the sweet spot. Use small adjustments and let it reveal itself.
Start in your established position and allow your body to settle.
Notice whatever Response is available.
Make one small positional adjustment — perhaps a slight change in pelvic angle, hip position, leg position or support.
Then stop.
Wait long enough to notice what happens next.
Did Response become clearer? Quieter? More distinct? Did nothing change?
If the adjustment helped, keep it. If Response weakened, reverse it. If nothing changed, resist immediately making another adjustment.
One change. One observation.
Attention helps you stay connected to Response.
If Response is faint, bring your attention a little closer. Notice its location, shape or rhythm without trying to make it stronger.
As Response becomes clearer, soften and broaden your attention rather than concentrating harder.
If your mind wanders and you lose the signal, gently return.
If you find yourself repeatedly checking whether Response is still there or getting stronger, you may have moved from noticing into monitoring.
As Response begins to develop on its own, let your attention follow rather than lead.
You are looking for enough focus to stay connected without taking over.
Begin with a Response you can recognise.
Bring your attention towards it and notice what happens.
Then gradually broaden your awareness — first around the sensation, then into more of the pelvis or body.
Notice whether Response becomes clearer, quieter, more stable or disappears from awareness.
Try moving your attention closer again.
You are not trying to discover one perfect level of focus. You are learning how Attention changes your experience of Response.
Find enough Attention to stay connected — without needing to supervise what happens next.
Input is anything you deliberately do to influence the experience — a pelvic contraction or release, subtle movement, pressure, contact or another intentional action.
In Align, you begin learning how much Input the current Response actually needs.
If Response is faint, a small additional Input may help.
If it is already clear or building, maintaining the same Input — or reducing it — may reveal that your body can continue without as much help.
The important thing is not to assume that stronger sensation requires stronger Input.
Make a change, then give Response time to answer.
You are looking for the smallest useful Input that supports the Response available right now.
Begin with a gentle Input that produces some recognisable Response.
Once you can feel that relationship, reduce the Input slightly.
Then wait.
Does Response continue? Does it weaken? Does it change character? Does something happen after the Input has stopped?
If Response continues, experiment with reducing Input a little further.
If it disappears, that is useful information too. You have learned something about how much support the Response currently needs.
There is no goal of reaching zero Input.
The aim is the minimum useful contribution — not minimum Input at any cost.
Response tells you what happened after a change in Position, Attention or Input.
In Align, you begin using that information to decide what to do next — if anything.
A Response might be faint, clear, dependent on Input, rhythmic, building, fading or beginning to continue by itself.
Before making another adjustment, read what is already happening.
Did the change make Response clearer? Did it continue with less Input? Did it become less stable? Or did nothing noticeably change?
Not every Response needs correcting, strengthening or extending.
Sometimes the most useful information is that what you are already doing is working.
Response is information. Let it guide the next decision.
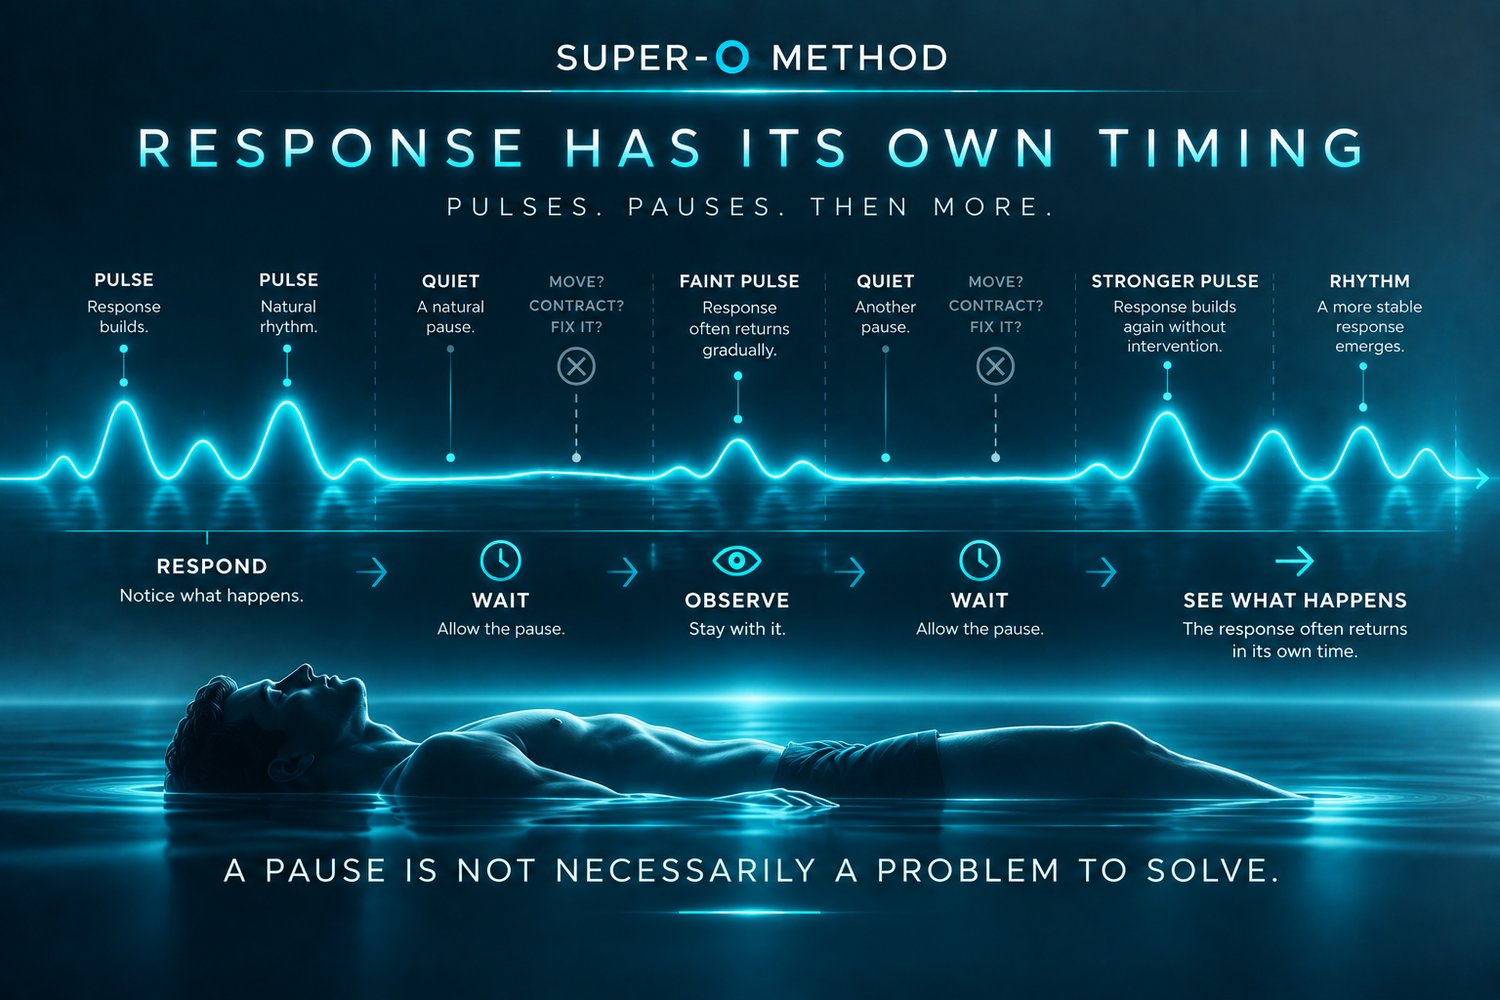
Response does not always arrive immediately after Input.
There may be a delay between what you deliberately do and what your body does next. If you adjust again too quickly, you can easily miss that relationship.
Make one change, then leave enough space for Response to answer.
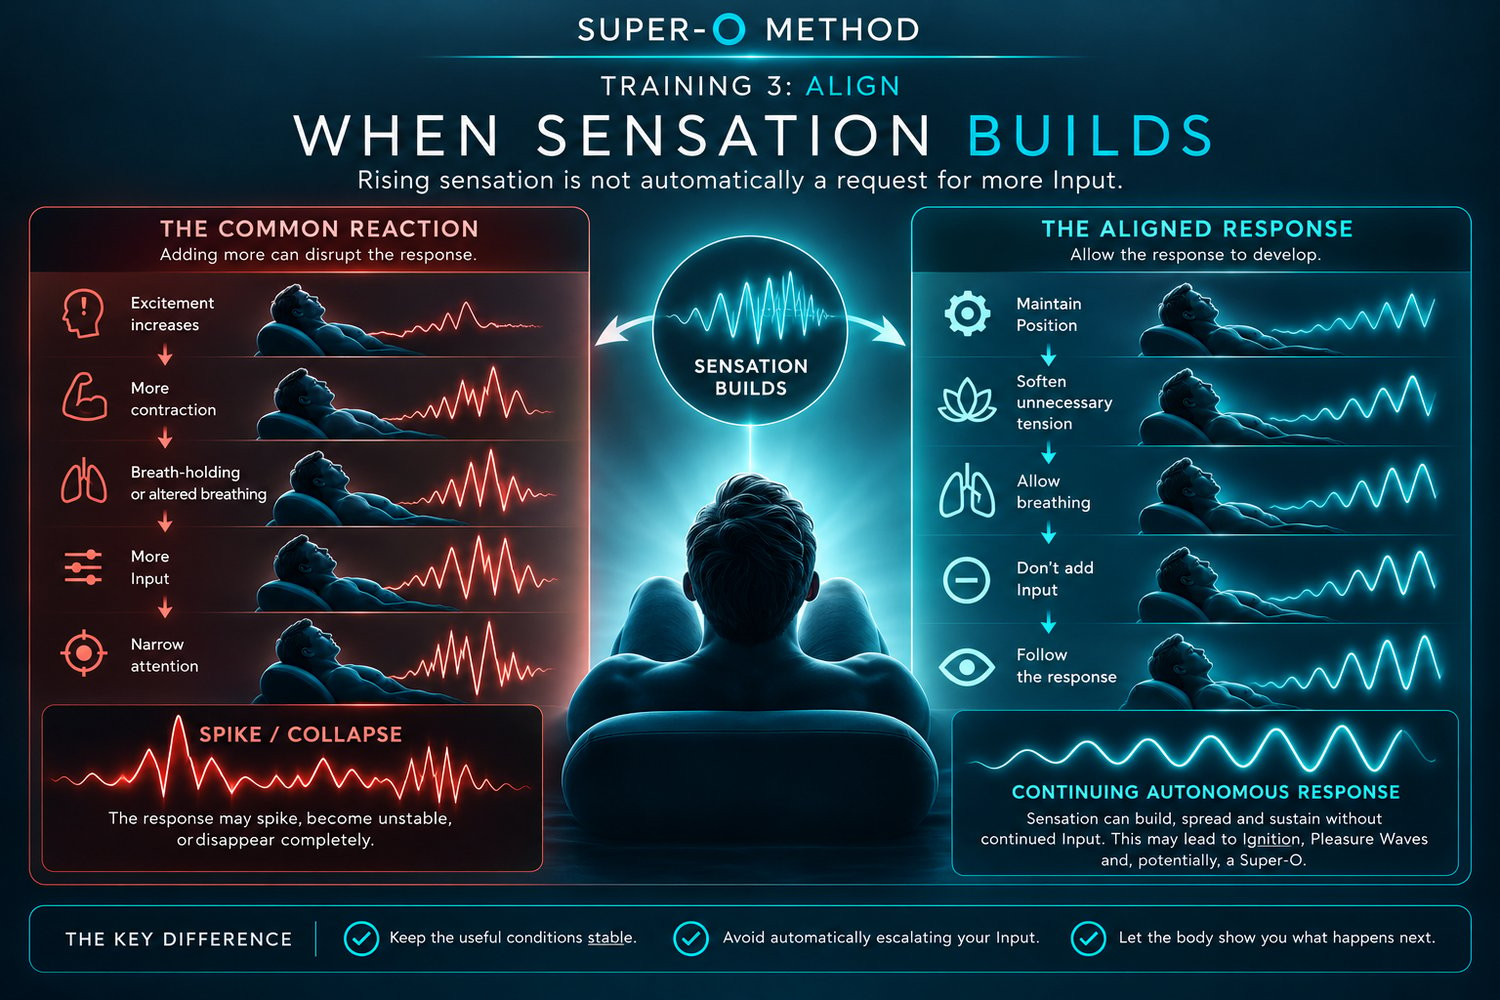
As Response grows stronger, the instinct is often to help it along — more contraction, movement, Input or focus.
But rising Response may already mean the conditions are working.
Before adding anything, notice what happens if you simply maintain those conditions and let Response develop.
Rising sensation is not automatically a request for more Input.
Bring the whole stage together.
1. SETTLE
Begin with the comfortable conditions established in Prepare.
2. DETECT
Notice whatever Response is available today.
3. READ
What is Response doing before you change anything?
4. ADJUST
If needed, change one variable — Position, Attention or Input.
5. WAIT
Give Response time to answer.
6. COMPARE
Is it clearer, quieter, more persistent or unchanged?
7. DECIDE
Keep, reduce or reverse the adjustment — or change nothing.
Change one thing. Observe what follows.
At first, the relationship may feel simple:
Input → Response
As Alignment improves, you may notice something different:
Less Input → Continuing Response
Response may persist, develop or even return after you stop helping.
That is useful information. It suggests that your body is beginning to contribute more of what happens next.
You do not need to chase this or turn it into another goal.
Notice it. Give it space. See what happens.
If Align still feels uncertain, spend more time with the drills before moving on.
The Further Drills give you additional ways to explore Position tuning, Attention, Input calibration and learning from Response.
You don’t need perfect Alignment before continuing.
You’re ready to explore Allow when you can:
If those skills are beginning to feel familiar, continue.